Showing posts with label floral print. Show all posts

Wednesday, October 10, 2012

New Floral Printed Pencil Skirts

Today I bought some fabulous floral printed cotton sateen to make some pencil skirts. The pencil skirts will be high waisted, and fitted around the leg and hip. The hem on the skirt falls to just below the knee. The pencil skirt shown in the next two photos is the style that I will create- the print will be the bright pink, white, navy blue and yellow print shown in the 3rd photo.


The fabric is gorgeous! The floral print is bright and colourful, while the cotton sateen is very comfortable to wear as it has elastane (lycra) added to the weave. 


I have enough of the pink, navy, yellow and white printed fabric above to make approximately 4 or 5 printed pencil skirts. They are available in Australian sizes 8, 10, 12, 14 and 16, and I will make them to fit and your length. The beauty about them being handmade! - you can get it custom made to fit you!

If you would like to order one of these beautiful, handmade pencil skirts, please email me at:


The green, navy, pink and mauve floral print above is available in a size 10 pencil skirt. This is a one of three pencil skirts... I only ever make a very limited edition of all of my designs.


The above photo shows me, wearing another Penelope Red pencil skirt, again from a cotton elastane,  in an ornage, yellow, white and blue abstract floral print.

I love wearing my printed pencil skirts- and they are perfect for travelling too! The below photo is my husband and I in St.Petersburg, Russia a few years ago. The elastane means that the skirt will hardly crease. The cotton means that the skirt will be very comfortable and easy to look after and wear.


For any enquiries, please email me at: designer@penelopered.com.au

Thursday, July 7, 2011

Inspiration for the Penelope Red Spring Summer Collection 2011-2012


Every time I start a new collection, I like to think of a theme, or an inspiration that captures my imagination. For a long time I have been envisaging this idea in my head, and I really just can't wait to see it happen before my eyes when the photo shoot is taking place.

As I design, I first like to think about what the whole look and feel of the photo shoot will be about- I guess this is a starting point, and then I work backwards.

I also like to try and mix inspirations together, so I can come up with something original.

The first inspiration, picured above is of a painting by Eugene-Auguste Francois Deully. Unfortunately there is not a lot of information on the net about this artist, and even when I look up the painting, it has two separate names. I will go by the name of "The Flower Seller".


I liked "The Flower Seller" because it has many beautiful colours, it has a pretty scene, and I think it is a fun, optimistic painting- something that I want the photo shoot to be about.

My textile agent also happened to be selling a lot of floral fabrics, and I thought they would go perfectly with this inspiration.


The other inspiration so far is Marie Antoinette. I guess a lot of people will presume it is becuase I liked the movie of the same name, starring Kirsten Dunst. I agree that the costumes and scenery was amazing, but the actual movie itself was not my kind of film.

I guess I am more inspired by the colours, the decadence, and after visiting the place in which she grew up, in Austria, who wouldn't be inspired!?


So, I now need to take all of this inspiration, colours, ideas, fabrics, and make it into a modern Penelope Red collection! Not an easy task, but I am looking forward to the challenge!

Sunday, April 25, 2010

The Making of The Venus Floral Bolero


Last week, I needed to create another Penelope Red Venus Floral Bolero for an order, so I thought it was a good opportunity to show you the "making of" this new design...

First I cut out all of the "main" pattern pieces from the vintage cotton floral fabric.


Next I cut out the fusing; this is a stiffening which you iron-onto the main fabric. By the time I cut out the vintage cotton, the fusing and then the lining, it takes a while!


Once the fusing is attached to the floral cotton, I then start to sew as many seams as I can.


In some areas I can attach the lining to the facing pieces.


To keep the neckline from stretching, I place some stay-tape around it.


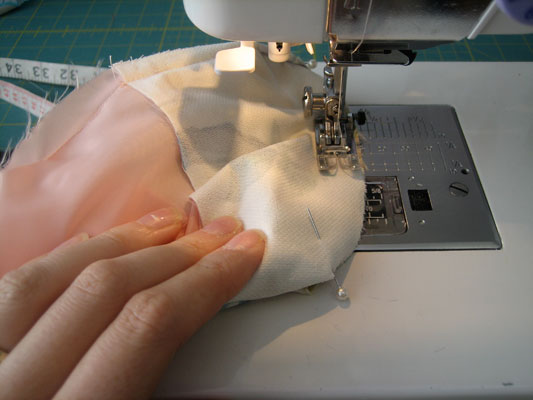
Next, the sleeves need to be fitted to the armhole. To do this, I place a gathering stitch around the sleeve-head, then I slightly gather it up to fit, and then use the iron to steam it. This shrinks the gathering and prevents puckering.


Once the sleeve-head is steamed, I pin it to the armhole, then I sew it in place.


Then I can focus on the lining and sewing the jacket together.


I like the lining to be just as neat as the outside, so I trim the seams to be neat, and press them flat.


I like to match up all the seams as best as possible too- including the lining.


Now that the lining is ready, I need to insert the pretty pink pleated frill around the neckline of the jacket, before I sew it all together. I create this pink frill from another vintage fabric. It is a large roll of pleated material, which I cut the edging off- this is what I use on the bolero.


Once the frill is attached to the jacket, I then sandwich the layers with right sides together, and sew around the entire edge.


I then trim and clip all seams, as it creates a better finish. Then the whole jacket is turned out through a gap in the lining seam- a little handy trick I learnt in college! This is where it really gets complicated!


Once it is turned out and the neckline has been under-stitched, I then need to finish off the sleeve hem. I do this by turning it inside out, through the same gap in the sleeve lining. It is too hard to explain, so just take my word for it when I say that is where my years of sewing experience comes in handy!


I like to use a contrasting blanket stitch on certain designs. I think it adds a certain handmade quality, while still looking chic and individual. In this design I use a bright pink thread to tone back in with the flowers in the print and the pink frill.

When I bought my sewing machine, I thought I was never going to need all of those fancy stitches that it can create. Now I am so glad they are available, as I think when I use them on my designs, it sets them apart from the rest.


By this stage it is practically done. All I need to do now is place the tiny hook and eyes onto the garment centre front. This is done by hand, and I even make my own little eyes with thread.


And the completed Penelope Red Venus Floral Bolero is done! You can purchase a copy of it in my etsy shop here.

Monday, March 8, 2010

New Style! The Venus Floral Bolero


I have finally had a chance to update this blog with a new Penelope Red design! Introducing the Penelope Red Venus Floral Bolero.


I have deliberately used photos that only show you sections of the bolero, as I want to unveil the whole design in a photo shoot, which will be taking place later on in the month- so keep watching this space for more!

This new cropped jacket design was inspired by Botticelli's "Birth of Venus" painting, and Jane Austen. Read more about this here.


The main fabric is a gorgeous vintage screen printed cotton, which was purchased from an antique dealer a few months ago in Sydney. The ruffle is another vintage fabric, which I have previously used on the Victorian Pink Corset as well. I thought the ruffle accents the bold flowers with a more delicate feel- I like the idea that each woman that wears this has a little boldness to them, but also has a little delicate, feminine side to them as well.


The jacket or bolero has been fully lined, and I have added a lovely pink decorative blanket stitch to the edge of the hem.


I am currently working on other styles that will be a part of this mini-range. I can't wait to show you more! I already have a corset and a gathered neck blouse to include.

Follow me on twitter or facebook for more updates of my latest designs and finds!

Updated on Tuesday 23rd March, 2010: I have added the Penelope Red Venus Floral Bolero to my etsy shop. Please take a look at this beautiful design here!

Tuesday, January 5, 2010

The Penelope Red Black Fuchsia Kimono


Another new style to show to you! The Penelope Red Black Fuchsia Kimono, handmade entirely by me!


It has been created from two seperate fabrics. The main is made form a silk/cotton fabric, which has a slight sheen to it. It has been printed with a lovely floral print in black, pink, green, blue and purple.


The second fabric is a recycled rayon (viscose) fabric, in plain black. I think using these two fabrics togetehr really sets this kimono apart from the rest. The Black shoulders and tie around the waist makes your eyes drawn to the shoulders and waist.


I like to wear Kimono's with a pair of black pants or a black mini skirt, but the choices are endless really.


This is now available in the Penelope Red etsy shop here.


I could imagine this style with some gorgeous pink lipstick, some black heels, and jewellery of your choice.