Showing posts with label design. Show all posts

Sunday, September 1, 2013

New Style: One Of A Kind Black And White Cotton Kimono Women's Dress

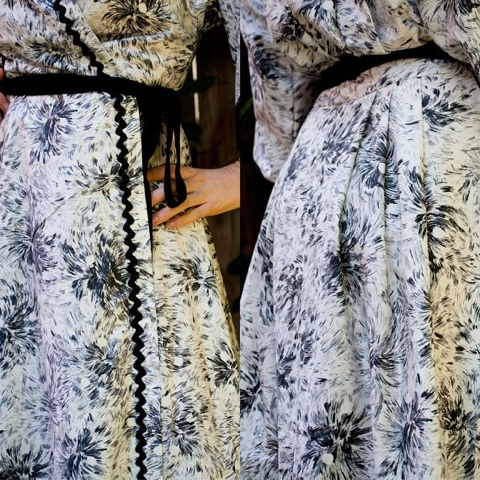
I recently created this Black and White Cotton Kimono Dress. It is a one of a kind design, and its the first of many new Penelope Red fashion designs for this Spring and Summer!


This 2013-14 Spring and Summer I am intending on using up a lot of my vintage fabrics. There are so many special fabrics I have collected over the years! Since all of the fabrics have very limited meterage there will be plenty of one of a kind designs!

The Black and White Cotton Kimono Dress pictured here has been handmade using a vintage cotton twill that is lightweight and has a slight sheen to it. The black print looks kind of like a splash of a paint brush in a circular motion.


I decided to add black rik rak braid (also vintage) down the front, to go with the black shoulder yoke and black cuff. Then I happened to have the white beaded flowers and they make the design look even more special I think!


Check it out: The One of a Kind Handmade Black and White Cotton Kimono Dress is available in my Penelope Red etsy shop online here.

Friday, March 4, 2011

Ms. Red Flashback Part 4: an old Penelope Red postcard


I have always said I am not the best illustrator, but when I try, I can do it. The above postcard started off as a lead pencil drawing, A3 size, of a woman wearing a corset. I then coloured it in in black marker. Once it was photographed, I loaded it into adobe illustrator, and created the hard black line- to make it look like a comic.

I had only just learnt how to use Illustrator and I wanted to experiment! So this postcard is one of the designs I created. I did this about three years ago. The postcards for Penelope Red have changed, but I still like this one as well.

Sunday, February 6, 2011

Ms. Red Flashback: photos of my work from previous years.

The following photos are of designs I created a few years back. I think it is fun to look back and see how much my designs have evolved, how much the photo shoot process has changed, and remember the happy customers who bought these designs.


Above, the Pocahontas Bustier and Poppy Jeans. Below: the Mucha Pants and Jade Nouveau Corset.


The Pocahontas Catsuit and the Bright Swirls Catsuit.

Around Paddington Markets, I was known for my corsets and catsuits. I have always loved wearing both styles and when I first decided to sell my designs I wanted to sell items that no one else was making. I wanted show stoppers!

The various Penelope Red corsets have made it many different countries by now: Germany, England, France, Brasil, America, Canada, Singapore, Japan, Hong Kong, New Zealand, and more.

The Penelope Red catsuits are a little more exclusive, so not many have been made. The Bright Swirls Catsuit (RHS) has been taken back to to Tokyo, and I simply had to keep one of these catsuits so the Pocahontas Catsuit (LHS) is mine, and I still receive comments on it whenever I wear it even now- 4 years later.


The White corset was very popular- one of my best corsets. I sold 4 copies of this in the one day!


The Carmen corset was all about having lots of fun, and experimenting with fabrics. They were quite a hit!


It is crazy to think that I have handmade so many pieces over the years! There will be more Penelope Red flashbacks to follow.

I now sell my latest designs at the Rocks Markets, Sydney. To find out more information, please visit the Penelope Red website.

Thursday, February 3, 2011

Creating the new Autumn Collection Part 3: A New Jacket Style


The very latest Penelope Red design is a new jacket style. This style is completely different to all of my other jackets and coats, having a fitted bust and waist area, centre front meets edge to edge, 3/4 sleeve with contrasting detail, and a full flared hip with contrasting detail. The jacket hem will sit around your hips.

I have tken a few photos and wanted to share them with you...


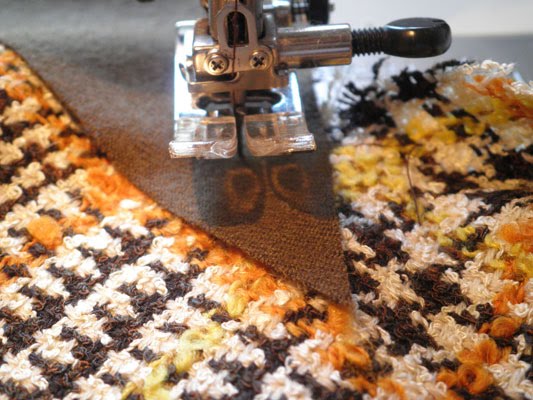
Above and below, sewing the contrasting panel into the sleeve.


When I create the Penelope Red wool coats and jackets, I use interfacing instead of fusing. It is a much better product, it creates a higher quality finish, and I feel it looks better too. You can see the interfacing in the next two pictures.

Below, the inside of the back...


...and the inside of the front.


Sewing the hip area to the waist, and below, sewing the sleeve to the body.


I always like to use contrasting lining- it is more exciting that way! Above, I am sewing the lining together.


When I create wool coats and jackets, I always make sure I clip and trim the seam allowances- this creates a much better quality finish.


Above, you can see the inside of the jacket as I am sewing the hooks and eyes onto the centre front.

This jacket has been made from a brown, cream, yellow and orange wool boucle for the main fabric, a brown wool twill for the contrasting and orange silk for the lining.

I haven't even named this design yet! I am currently in the middle of organising the photo shoot for the Autumn collection, where this jacket will take centre stage- so really looking forward to this range coming together!

Friday, August 28, 2009

The Penelope Red Silk Road Winter Dress


I wanted to show you one of my very latest designs! This is the Penelope Red Silk Road Winter Dress. I have shown you the same Winter Tailored Dress style, in other fabrics, before, but it still amazes me how different each of these dresses can look by simply changing the fabric.

Please note these photos were taken with a very simple camera, and the photos are not the best, but I couldn't wait for the photo shoot to show you the design! It will look amazing in the photo shoot, once we have a proper model and a fantastic photographer.


Each of the fabric's featured here are recycled fabrics. The black and white check is a wool blend, the aqua is wool, and the red is made from a synthetic fibre.


I love creating contrast, and the colours really pop out! I used these colours together as they accentuate the shapes of the panelling, and I also think it is something unique.


The dress has been fully lined with red polyester lining (which was recycled too). I love using recycled fabrics, or vintage fabrics, as it means that no one else will have it!


This is a one-off design, and there will be others I can make in other fabrics, but they will never be exactly the same. It will be on sale in the Penelope Red Etsy store in late September/Early October 2009.

Meanwhile, please take a look at the latest Penelope Red photo shoot here.

If you would like to order this style, or want one custom made (and we can discuss other fabrics and colours), then please email me at: designer@penelopered.com.au

Wednesday, July 22, 2009

Silk Ikats of Central Asia: Art Gallery of NSW


Yesterday I visited the Art Gallery of NSW to view their latest exhibition, Silk Ikats of Central Asia.


While it was a small exhibit, the displayed items were extremely beautiful, and very inspiring for my work!


The embroideries, colours, detail, patterns, prints, and textures were just simply stunning, and it truly is amazing how much work is involved in each piece. It is astounding that each and every piece was created by hand, and it really inspires me to want to create more hand worked pieces.

I would recommend this exhibit to anyone who is interested in or enjoys needlework/craft, printing, fashion, costume, cultural and historical backgrounds.

After viewing the works at the gallery, I returned home full of inspiration for my latest Penelope Red designs! I am hoping to base my latest designs and next photo shoot on these costumes, colours, bold embroideries, and exotic jewellery. It will be quite exciting to see it all together, and I can't wait to show you!

Please note, not all images displayed in this post are from the gallery exhibition. Some of the images I found on the net.

The shape of the Penelope Red Hooded Coat is perfect to reflect the robes, the mini skirts I have made so far reflect the bold colours, and the textured embroideries.


Monday, July 20, 2009

How-To Frame Your Photos Uniquely Part II


As promised in part 1, these are the steps for the wedding "artworks":

1: Collect all the materials you will need (clean chopping board, metal ruler, long plastic ruler, pencil, blade, your papers). I used frames from Ikea for this project. The Ribba series is recommended.

2. You need to first decide on what papers you will use. I used the rust/red colour, and the gold, because I wanted to place these framed photos in our bedroom, and the colour scheme happens to be Rust/red, gold, white and black. I deliberately used a photo that was smaller than the mount size, so I can have a large double mount of gold. I bought my papers from Pepe's Paperie.

3.Measure the photo. Minus approx 1cm from the width, and 1cm from the height, then halve each of these measurements. Square up on the back of your A4 piece of board (I used the gold cardboard for this), these measurements (starting from the outside). Check to make sure your photo sits approx 5mm outside of each of these lines.

4.Using your metal ruler, blade, and clean chopping board, cut along the line, to create a window for the photo to sit in.

5.Use sticky tape to tape the photo face-down to the back of the window mount. Sticky tape is best, as it allows you to undo it, and reapply if necessary.

6.Check to make sure the photo is sitting square to the mount.


7. Using the mount, draw the dimensions of the window size for the large mount, onto your piece of paper. (In my example, this is the rust coloured paper)

8. Cut this paper out, and cut out the window.

9.I decided that the mount looked best, with a highlight of black. The best way to do this is get a wide pen, and very carefully mark along the diagonal edge. (see photo)


10. Glue your pretty paper, to the large window mount. Then tape the small window mount, face-down to the large window mount. Check that it has been lined up square.


11. I decided to decorate the corners with a little gold detailing, but this is entirely optional.

12. Assemble the frame as normal, and hang it proudly!


Friday, July 17, 2009

The Penelope Red Kaleidoscope Mini Skirt

The picture above, of me, was taken with the help of my hubbie- so it isn't poffessional, but atleast you can see it properly on a body.


Today I finished a new design- The Penelope Red Kaleidoscope Mini Skirt. I am loving the colour/fabric combination! While I understand that the combination is not for everyone's taste, sometimes it isn't about pleasing the masses... I like to keep it fresh and sometimes create items just for the love of doing it! This is what keeps me coming back!


I wanted to create a mini skirt that wasn't too mini. I wanted a length that was still classic and sophisticated, so this skirt is short- but not sky high.

I decided to place a curved panel down each side, as this creates an optical illusion, as well as it is my signature look- I love my panels! The curved panel means that the darker fabric (the plain Emerald Green Silk) is detracting from the thighs. The peach satin binding is creating a longer line, and draws your eye up and down the length.


When I make straight skirts or fitted skirts, I like to try and curve them around the hips and butt- we want to show off the curves! Not hide them in excess fabric!

This skirt was made from two beautiful 100% Silk fabrics. Together, they have such a luxurious feel, and the satin binding just lifts it even further!


I also managed to match the check where possible.


Of course, it is fully lined as well, with an invisible zip.

I only have enough fabric for two of these skirts- so this skirt is 1 out of 2. I hope whoever decides to buy it, loves it! This will be available in the Penelope Red Etsy store, in September 09.